Friday, 28 April 2017
Βελονάκι Τριαντάφυλλο - Πώς να κανουμε ένα τριαντάφυλλο με το τσιγκελάκ...
Σχολή Εργόχειρου
Βελονάκι Τριαντάφυλλο / Crochet a Rose
Πώς να κανουμε ένα τριαντάφυλλο με το τσιγκελάκι/ How to crochet a Rose
Written instructions and tutorial links in Greek and English
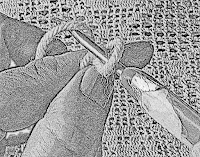
Hi, in this post and the tutorial below you can see how to crochet a ROSE.
Επειδή στο Google + υπάρχουν φίλοι που κοιτάζουν τα ποστ μου οι οποίοι δεν γνωρίζουν ελληνικά θα προσθέσω τα link και κάποιες απλές οδηγίες και στα αγγλικά, έτσι ώστε κατά κάποιν τρόπο να γίνομαι πιό κατανοητή.
Οι βελονιές που θα πρέπει να γνωρίζουμε είναι/ Crochet stitches considered already known are:
Πώς αρχίζουμε με τις τεχνικές/ how to start crocheting with the techniques:
Μαγικός Κύκλος/Δακτυλίδι / Magic Ring/Circle
Αρχικός κόμπος και αλυσιδίτσα / Slip knot and the foundation chain
Βασικές βελονιές / Crochet the basic stitches
Βελονιά σε σχήμα V / Crochet the V-Stitch
Ποδαράκι / Double crochet stitch
Οδηγίες / Instructions
Αρχίζουμε κάνοντας 30+3 αλυσιδίτσες / ch 30+3
Σειρά 1 Row 1
Κάνουμε 1 βελονιά σε V (1 ποδαράκι, 1 αλυσιδίτσα, 1 ποδαράκι) στην 4η αλυσιδίτσα από το τσιγκελάκι μας / 1 V-Stitch (1 Double crochet , ch 1, 1 double crochet ) from the crochet hook.
*Κάνουμε 1 αλυσιδίτσα, αφήνουμε κενή 1 αλυσιδίτσα και στην επόμενη δουλεύουμε 1 βελονιά σε V * / * Skip 1 chain into the next one crochet 1 V-Stitch*
Επαναλαμβάνουμε από * έως * ως το τέλος τησ σειράς / Repeat from * to * throughout the row.
Δείτε το βίντεο για λεπτομερείς οδηγίες / In the video tutorial below you can find detailed instructions.
Thursday, 27 April 2017
Βελονάκι (τσιγκελάκι): Πώς αρχίζουμε με τον αρχικό κόμπο και αλυσιδίτσα: Για δεξιόχειρες και αριστερόχειρες
Σ'αυτό το ποστ θα βρείτε οδηγίες για το πώς αρχίζουμε να δουλεύουμε τσιγκελάκι για δεξιόχειρες αλλά και για αριστερόχειρες
Χρήσιμα link:
Για δεξιόχειρες:
για αριστερόχειρες:
Για δεξιόχειρες

Για αριστερόχειρες

Γοα δεξιόχειρες


Για δεξιόχειρες

Για αριστερόχειρες

Για δεξιόχειρες

\
Για αριστερόχειρες

Uncinetto: Come avviare e come fare il cappietto iniziale e la catenella...per destrimani e per mancini
In questo post troverete istruzioni su come avviare un lavoro all'uncinetto sia per destrimani che per mancini
Link utili:
Per destrimani:
Per chi ha come mano dominante la sinistra (mancini):
Per destrimani

Per mancini

Per destimani

Per mancini

Per destrimani
Per mancini

Per destrimani

Per mancini

Link utili:
Per destrimani:
Per chi ha come mano dominante la sinistra (mancini):
Per destrimani
Per mancini
Per destimani
Per mancini
Per destrimani
Per mancini
Per destrimani
Per mancini
Crochet: How to Slip Knot & Chain Stitch - How to Crochet - How to make a slip knot and a foundation chain tutorial for left handed and right handed
Crochet
How to Slip Knot & Chain Stitch - How to Crochet
Crochet: How to make a slip knot and a foundation chain tutorial for left handed and right handed
In this post we'll see how to make a slip knot and a foundation chain both for right handed and for left handed.Learn how to start your crochet projects using a slip knot and chain stitches with this ... the chain should be firm, but not tight
Useful link:
for right -handed:
For left-handed:
1. Put the yarn over your index finger. Be careful to place the shirt parttowards you and the long tail from the other side
for right handed

for left handed

2. Insert the hook from back towards forth
for right handed

for left handed

3. Turn the hook to create e loop
for right handed

for left handed

4. With your thumb finger keep the loop
5. Yarn over and pass the yarn throughout the loop
for right handed

for left handed

©Copyright 2017-2019 Creations by SerenaPaliria, All Rights Reserved
Wednesday, 26 April 2017
Βελονάκι(τσιγκελάκι): Πώς να κάνετε το μαγικό δακτυλίδι ( μαγικό κύκλο)
Σχολή Εργόχειρου
Οι Βασικές βελονιές
Βελονάκι(τσιγκελάκι): Πώς να κάνετε το μαγικό δακτυλίδι ( μαγικό κύκλο)
Γεια σας :)
Σ'αυτό το ποστ και το βίντεο που ακολουθεί θα συνεχίσουμε το ταξίδι μας στον θαυμαστό κόσμο της δημιουργίας και του εργόχειρου.
Όταν θέλουμε να δουλέψουμε με το τσιγκελάκι, το πρώτο πράγμα που θα πρέπει να γνωρίζουμε είναι το πώς αρχίζουμε.
Υπάρχουν 2 τροποι/τεχνικές για να αρχίσουμε ένα εργόχειρο με το τσιγκελάκι.
Ο ένας έιναι με την τεχνική του αρχικού κόμπου και της βασικής αλυσιδίτας. Είναι η τεχνική η οποία χρησιμοποιείται κυρίως όταν θέλουμε να δουλέψουμε σε σειρές, δηλαδή ίσια αν και μπορεί να χρησιμοποιηθεί και όταν θέλουμε να δουλέψουμε στρογγυλά πλεκτά και τότε ενώνουμε τις αλυσιδίτσες έτσι ώστε να δημιουργήσουμε έναν κύκλο.
Η τεχνική που κατ'εξοχήν χρησημοποιούμε για να δουλέψουμε στρογγυλό πλεκτό είναι αυτός που βλέπουμε σ'αυτό το ποστ και στο βίντεο που ακολουθεί. Είναι η τεχνική μαγικό δακτυλίδι ( μαγικός κύκλο).
©Copyright 2017 Creations by SerenaPaliria, All Rights Reserved
Uncinetto: Come fare l'anello magico per principianti
In questo tutorial vedremo come avviare un lavoro all'uncinetto con la tecnica dell'anello magico.
Crochet: How to make a MAGIC RING (School of Crochet)
In this tutorial of crochet we are going to learn how to start crocheting with the technique of magic ring.
Useful link: if you can't open the video please click here https://youtu.be/7Ffh5k6Q20w
To make a magic ring roll aroind the fingers of your left hand the yarn three times. Insert the hook under the three pieces of yarn and wrap the third one, pass it under the other two.
Useful link: if you can't open the video please click here https://youtu.be/7Ffh5k6Q20w
To make a magic ring roll aroind the fingers of your left hand the yarn three times. Insert the hook under the three pieces of yarn and wrap the third one, pass it under the other two.
Monday, 24 April 2017
Knitting: How to make Double cast on by using double yarn
Knitting:
How to make Double cast on by using double yarn
How to double cast on by using double yarn by using the thumb and index fingers
IT- Maglia AVVIO CON DOPPIO FILO (indice e pollice) TUBOLARE per COSTA INGLESE:Come avviare le maglie tutorial in italiano
EL -Πλεκτό: ΡΙΞΙΜΟ ΠΟΝΤΩΝ. ΠΩΣ ΡΙΧΝΟΥΜΕ ΘΗΛΙΕΣ ΓΙΑ ΕΓΓΛΕΖΙΚΟ ΛΑΣΤΙΧΟ με αντίχειρα και δείκτη
How to make Double cast on by using double yarn
This is the second way to cast on when kitting. By using this technique we create two stitches
Stitch 1
Step 1. Le length of the yarn to use is 3 times the length we need to knit. (see picture 1)
Picture 1

Step 2. Take the part of double yarn on the left hand and the needle on the right one ( see picture 2)
Picture 2

Step 3 Yarn over on the thumb finger ( see picture 3)
Picture 3

Step 4. Insert the needle between the thumb finger and the yarn where is created a loop (see picture 4)
Picture 4

Step 5. Yarn over and pull the yarn through the loop
Stitch 2
Step 1
Create e loop by using the thumb and index fingers and insert the needle (see picture 5)
Picture 5

Step 2 Yarn over and pull out the yarn
In the video tutorial below you will see the step by step instructions that will help you learn double cast on
©Copyright 2017-2018 Creations by SerenaPaliria, All Rights Reserved
Knitting: Elastic Cast_On Technique: Double cast on with double yarn
School of Knitting
Knitting: Double cast on with double yarn
How to cast on with the technique of double yarn / index - thumb and obtain a ribbed stitch
EL- Πλεκτό: ΡΙΞΙΜΟ ΠΟΝΤΩΝ. ΠΩΣ ΡΙΧΝΟΥΜΕ ΘΗΛΙΕΣ ΓΙΑ ΕΓΓΛΕΖΙΚΟ ΛΑΣΤΙΧΟ με αντίχειρα και δείκτη. tutorial στα ελληνικά
IT- Maglia AVVIO CON DOPPIO FILO (indice e pollice) TUBOLARE per COSTA INGLESE: tutorial in italiano
FR - Tricoter: comment monter les mailles avec double fil pour faire maille à cotes :tutoriel en français
Dear knitters!!! Welcome to another tutorial :)
When we start knitting the first thing to do is casting on which means that we have to make a certain number of stitches and keep then on the needle.
There are different ways to cast on and obviously is not easy learn and remember all of them. You can learn two or three of them and you will be able to knit everything you like.
A simplest way of casting on is the long tail, finger and thumb method .
The double cast on consists on two steps casting on. In this post you can find both pictures with explanations and video tutorial so you can learn it easier.When we start knitting the first thing to do is casting on which means that we have to make a certain number of stitches and keep then on the needle.
There are different ways to cast on and obviously is not easy learn and remember all of them. You can learn two or three of them and you will be able to knit everything you like.
A simplest way of casting on is the long tail, finger and thumb method .
How to calculate the yarn needed.
We take 3 times the length we need.

Step 1
For the step 1 we use the thumb finger of our left hand
1. Wrap around the thumb of your left hand the double part of the yarn
2. Insert the needle from bottom to top trough thumb and the yarn

3. Yarn over with the long tail of the yarn

You can see that you have created e loop.
4. Pass the loop around the needle

secure the ends of the yarn with fingers and the palm of your left hand.
Step 2
For the step 2 we use the index and thumb fingers of our left hand
1. Wrap around the index of your left hand the yarn and then use the thumb to keep in tension the yarn. Close your index finger to create a kind of circle or hook.

2. Insert the needle and yarn over

3. Pass the loop you have created around the needle

You can see that on the needle are couples of stitches

Enjoy you knitting :)
=====================================================
Related Links:
How to Knit the Stockinette Stitch-Knit Stitch-Purl Stitch-stocking stitch- Jersey Stitch |
| How to Knit the Stockinette Stitch-Knit Stitch-Purl Stitch-stocking stitch- Jersey Stitch |
Knitting the REVERSE GARTER STITCH
 |
| Knitting the REVERSE GARTER STITCH |
KNITTING : LONG TAIL CAST ON METHOD
 |
| KNITTING : LONG TAIL CAST ON METHOD |
Knitting: BRIOCHE STITCH
 |
| Knitting: BRIOCHE STITCH |
===================================================
====================================================
Saturday, 22 April 2017
Πλεκτό: Πώς ρίχνουμε θηλιές με διπλή κλωστή για εγγλέζικο λάστιχο - Knitting double cast on
Σχολή Εργόχειρου: πλέξιμο με βελόνες
Πώς ρίχνουμε πόντους/θηλιές με διπλή κλωστή για να πλέξουμε εγγλέζικο λάστιχο.
Πώς μπορούμε ναρίξουμε πόντους/θηλιές και να αρχίσουμε να πλέκουμε με διπλή κλωστή για να πλέξουμε εγγλέζικο λάστιχο
FR - Tricoter: comment monter les mailles avec double fil pour faire maille à cotes :tutoriel en français
IT- Lavorare a maglia: come avviare a maglia con doppio filo per lavorare a coste/cannolé : tutorial in italiano
Υπάρχουν πολλοί τρόποι για να αρχίσουμε το πλεκτό και να ρίξουμε πόντους/θηλιές . Είναι αρκετοί δύο ή τρεις για να μπορέσουμε να πλέξουμε οτιδήποτε επιθυμούμε.
Έχω ήδη παρουσιάσει έναν πιο απλό τρόπο: το ρήξιμο πόντων με μονή κλωστή με τον δείκτη και τον αντίχειρα και το πώς ρίχνουμε θηλιές με βελόνα και βελονάκι.
Για να ρίξουμε θηλιές με διπλή κλωστή και να πλέξουμε εγγλέζικο λάστιχο χρησιμοποιούμε τον αντίχειρα και τον δείκτη του αριστερού μας χεριού.
Το μήκος της κλωστής πρέπει να είναι 3 φορές το μήκος της κλωστής που μας χρειάζεται για να πλέξουμε.

Το βιίντεο που ακολουθεί θα σας βοηθήσει να μάθετε να αρχίζετε για να κάνετε εγγλέζικο λάστιχο.
Οδηγίες:
Για να κάνουμε την πρώτη θηλιά:
1. Κρατούμε το διπλό μέρος της κλωστής με το αριστερό μας χέρι και την μία βελόνα με το δεξί.

2. Τυλίγουμε την κλωστή στον αντίχειρα του αριστερού χεριού

3. και τοποθετούμε την βελόνα από έξω προς τα μέσα όπως στη φωτογραφία

Κάνουμε 1 ξετέ και βγάζουμε την κλωστή από την θηλιά
Για να κάνουμε την δεύτερη θηλιά
1. Τοποθετούμε τον αντίχειρα και τον δείκτη του αριστερού μας χεριού όπως στην φωτογραφία και δημιουργούμε μια θηλιά.
2. Στη συνέχεια τοποθετούνε την βελόνα όπως στη φωτογραφία
κάνουμε ένα ζετέ και βγάζουμε την θηλιά.

©Copyright 2017-2018 Creations by SerenaPaliria, All Rights Reserved
#Πλέξιμο #ΠλέξιμοΜεΔιπλόΝήμα #ΠέξιμοΜεΔιπλήΚλωστή #ΠλέξιμοΠώςΡίχνουμεΘηλιές #Π΄'εξιμοΠώςΡίχνουμεΠόντους
Maglia costa inglese Come avviare un lavoro a maglia con doppio filo, double cast on
Scuola di malgia
Come avviare un lavoro a maglia con doppio filo
Come avviare un lavoro a maglia usando doppio filo e le dita indice e pollice
How to double cat on -Start knitting with double yarn and the fingers: index and thumb :tutorial in English
Πλέξιμο με βελόνες: ρίξιμο πόντων με 2 κλωστές για εγγλέζικο λάστιχο: tutorial στα ελληνικά
Tricoter: Montage des mailles avec 2 fils pour maille à côtes: tutoriel en français
Tricoter: Montage des mailles avec 2 fils pour maille à côtes: tutoriel en français
Cari/e knitters!!! In questo tutorial e il video che segue potrete apprendere come avviare a maglia per poi lavorare per esempio a coste/cannolé 1x1, un inizio che rende il lavoro più elastico.
Esistono molte tecniche per avviare un lavoro a maglia, ovviamente non è possibile conoscerli tutti, bastano due o tre tecniche per poter avviare e lavorare ogni tipo di lavoro a maglia.
Ho già proposto un altro modo per avviare un lavoro a maglia: l'avvio con il filo singolo e usando le dita indice e pollice
La lunghezza del filo deve essere tre volte la lunghezza del filo che volgiamo lavorare
Maglia 1
Il filo doppio si tiene con la mano sinistra mentre il ferro con la mano destra
Si avvolge il filo doppio intorno il pollice della mano sinistra
e si inserisce il ferro come nella foto che segue
In questo modo si crea un cappietto. Si fa 1 gettato e si passa il filo attraverso il cappietto.
Maglia 2
Si tiene il filo con lindice e il pollice della mano sinistra come indicato nella foto che segue.
In questo modo si crea un cappietto.
Si fa un gettato e si passa il filo attraverso il cappietto.
Nel video tutorial che segue potete imparare seguendo le istruzioni
©Copyright 2017-2018 Creations by SerenaPaliria, All Rights Reserved
Subscribe to:
Comments (Atom)
Crochet: Le POINT TORSADES au crochet - BRIDES TRESSEES au crochet

Comment faire le Point 3 Brides Coisées et 1 bride Diagonale au crochet
Uncinetto PUNTO INTRECCIATO Diagonale/TRECCINA 2 principianti

Come Fare Il Punto Intrecciato di 3 Maglie Alte e 1 Diagonale